
No results. Try a different search term.
Overview
GigBox is your backing setup on the iPad. The app plays MIDI files (including karaoke), styles, and MP3s – through any connected MIDI device or through the iPad’s audio output. Everything you need for rehearsal and the stage is in one app:
- Library and SetLists for songs, styles, MP3s, and lyrics,
- the MIDI Player with a 16-channel mixer and the MP3 Player with scrolling lyrics,
- Live, the stage view with large lyrics and function keys F1–F12,
- Arranger, Creator, FX, and Synth for playing and shaping sounds,
- the free lyrics display for iPhone and a second iPad.
The full app runs on the iPad in landscape. The dark design is built for poor stage lighting. Your data is stored in iCloud and can be backed up as a ZIP file.
Getting Started
After launch, GigBox briefly shows its logo and then opens the HUB – the overview of all areas. Here’s how to be ready to play in a few minutes:
- Connect your keyboard or module to the iPad with a USB cable (or another MIDI interface).
- In the HUB, tap Settings, and under Devices choose the Sound engine (MIDI output) and, if you play live, the Keyboard / controller (MIDI input).
- Under Instrument, choose your device. Without a selection, GigBox uses Standard (General MIDI).
- Open the Library, tap Import › Files, and choose your MIDI files, styles, MP3s, or lyrics from the Files app.
- Tap a song – it opens in the matching player. Tap ▶ in the transport dock to start playback.
If you play without an external device, MP3s play through the iPad’s audio output. You choose the output (e.g. headphones, Bluetooth, or an audio interface) under Settings › Devices › Audio output.
Interface & HUB
Every area has the same header bar at the top:
- HUB pill (left): shows the active area, e.g. HUB | MIDI PLAYER. A tap opens the HUB; a double-tap jumps back to the last area you used – handy for switching between two areas live.
- Center: controls for the active area, such as the file name and Save in the MIDI Player or the performance picker in the Creator.
- Right: the red Panic button (all notes off), the padlock for the lock, and the gear for Settings.
The HUB
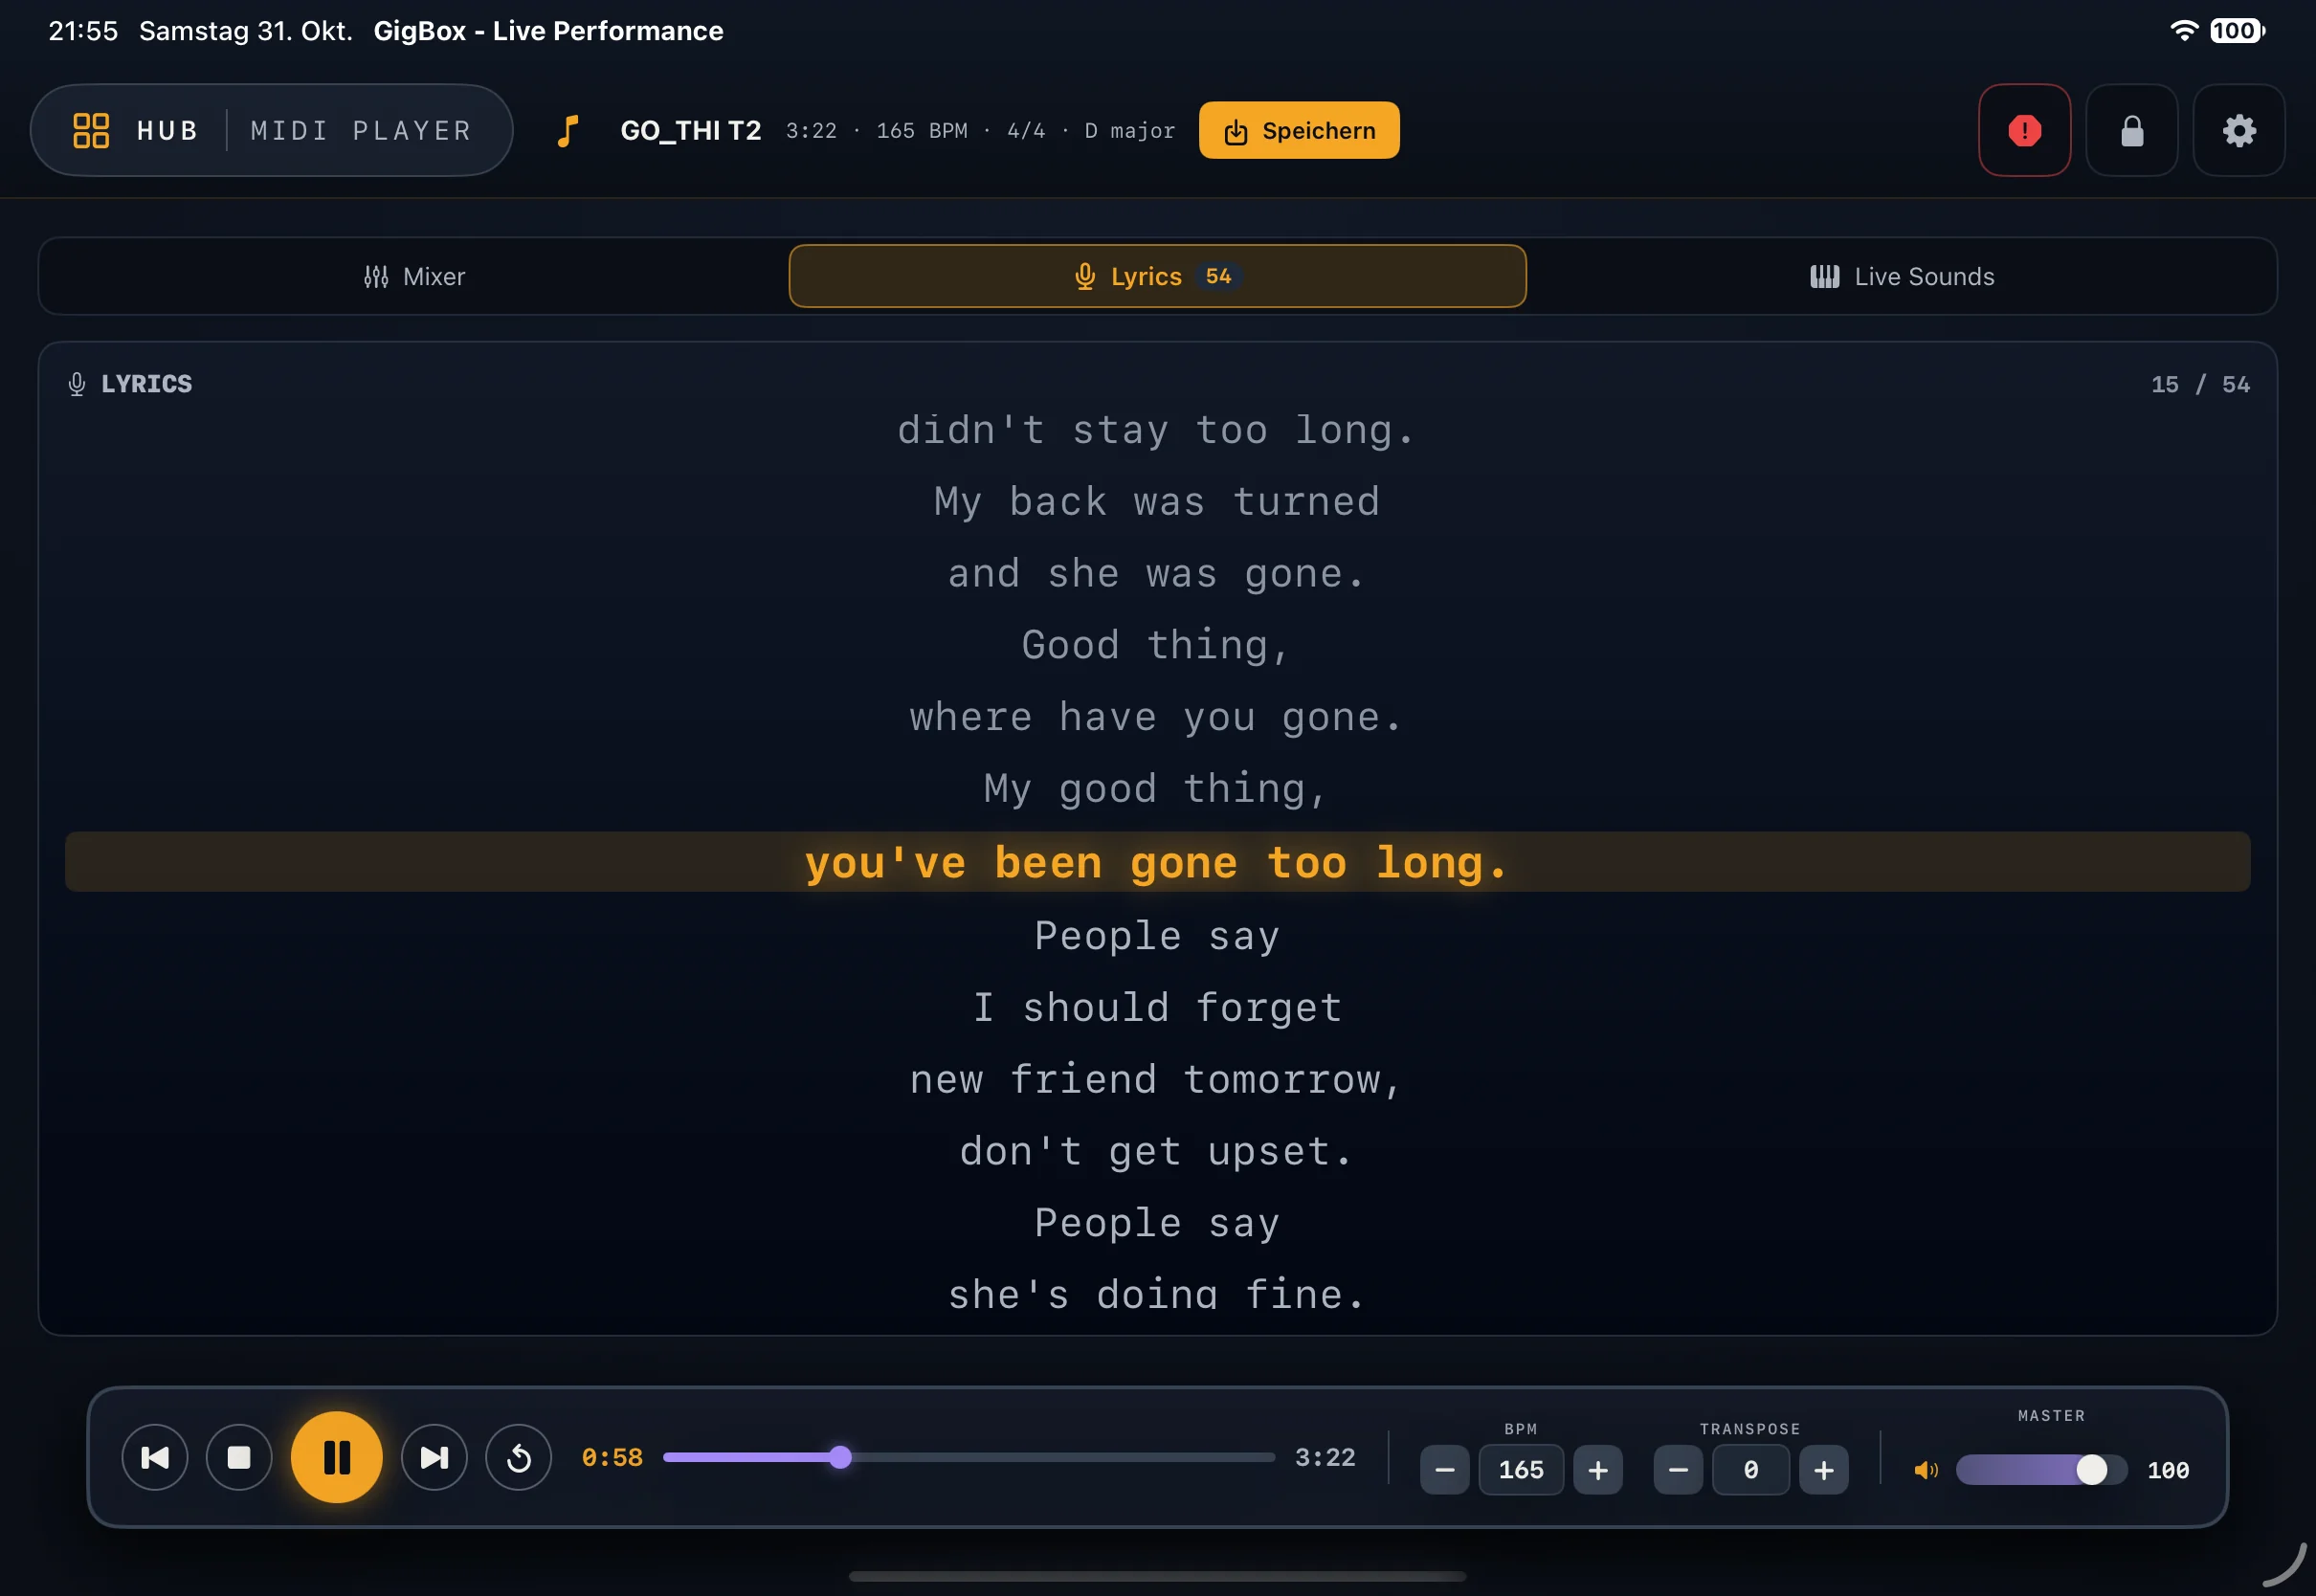
The HUB is the only way to navigate between areas. It fills the whole screen and arranges all areas in three bands:
- Playback: Library (Songs & styles), MIDI Player (16-track mixer), MP3 Player (Audio playback), and Live (Setlist & Lyrics).
- Play & Sound: Arranger (Accompaniment), Creator (Sound Workshop), FX (Effect rack), and Synth (Sound engine).
- System: Settings with the MIDI IN and MIDI OUT lights – green means connected.
The active area is highlighted; the top right shows ACTIVE · …. Next to the NAVIGATION title you see the selected MIDI device. A padlock icon on a tile means the area isn’t unlocked yet. The Arranger carries the BETA label. Close the HUB with ✕ or by swiping down.
 1
2
3
 1
2
3
4
Library & Import
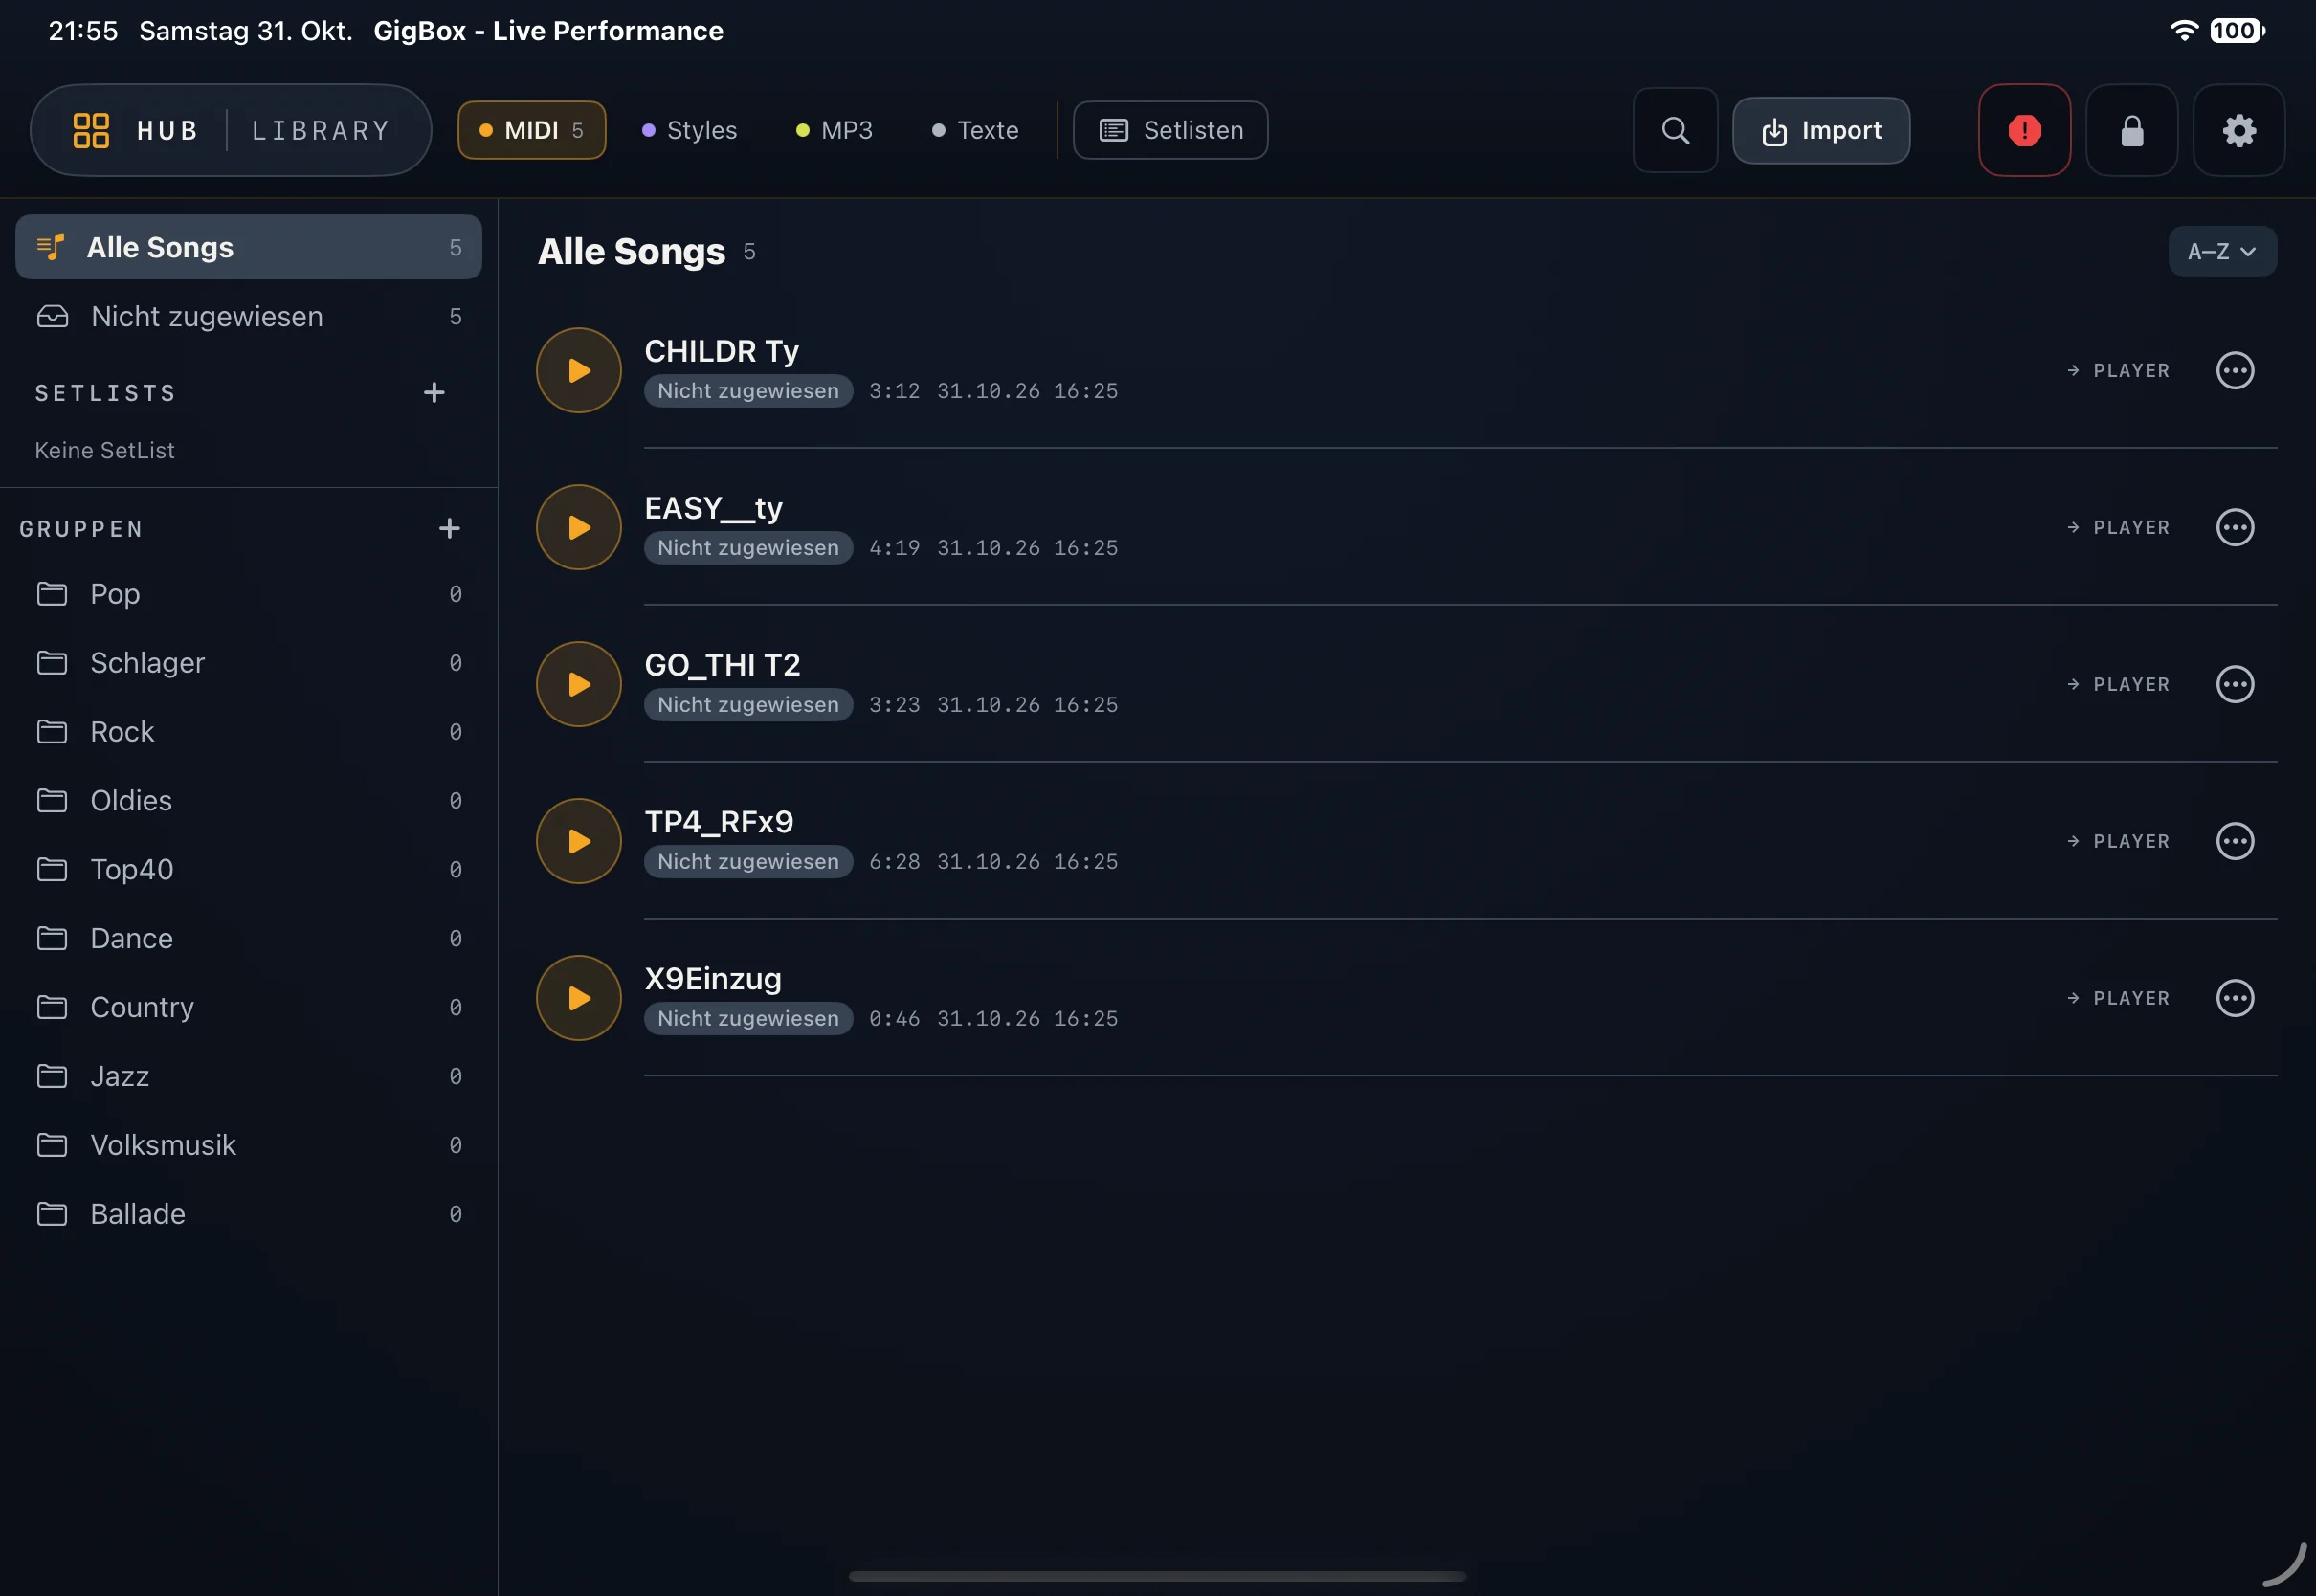
The Library is the archive of all your files. At the top you choose between four tabs: MIDI (MIDI files), Styles, MP3, and Texts; the number next to each tab shows how many files it contains. Next to them, SetLists opens your setlists. Use the magnifying glass to search the active tab, and sort A – Z or Z – A at the top right above the list.
Each row shows title, group, duration, and import date. ▶ plays the song right away, → PLAYER opens it in the matching player, and the ⋯ menu offers more commands.
Import Files
- Tap Import, then Files.
- In the Files app, choose one or more files – from the iPad, iCloud Drive, or a USB stick.
- GigBox shows Importing … with a counter. Wait until all files are saved.
GigBox recognizes MIDI files (including karaoke), styles (STY, PRS), MP3 and other audio formats, as well as text files and PDFs as lyrics. PDFs over 3 MB aren’t imported. If a file is already in the Library, GigBox asks: Replace, Keep both, or Skip.
Groups, Favorites, and Context Menu
- Groups organize your songs, for example by genre, band, or program. Create new groups on the left under GROUPS with +. All songs always shows everything, Unassigned shows the songs without a group. You can rename groups or remove them with Delete group – the files stay.
- Favorites: mark styles with the star. Your own styles carry the CUSTOM label.
- Touch and hold an entry for Rename and Delete from library.
- For MP3s you’ll also find Extract chords, Re-detect chords, and Remove chords there. MP3s with chords show the note Chords available.
 1
2
3
4
5
Setlists
A setlist sets the running order of your evening. It can mix MIDI files, styles, and MP3s. Tap an item to open it in the matching player.
- In the Library, under SetLists, tap New SetList, enter a name, and tap Create.
- Under ADD ITEMS, append items with +.
- Drag the items into the right order.
When a setlist is active, the MIDI Player shows its name and the current item above the mixer. Use ◀ and ▶ to jump to the previous or next song. Live also plays a setlist in order.
Touch and hold a setlist to rename it or remove it with Delete SetList. When you delete it, the files stay in the Library. If a file is missing, (not found) appears after the title.
MIDI Player & Mixer
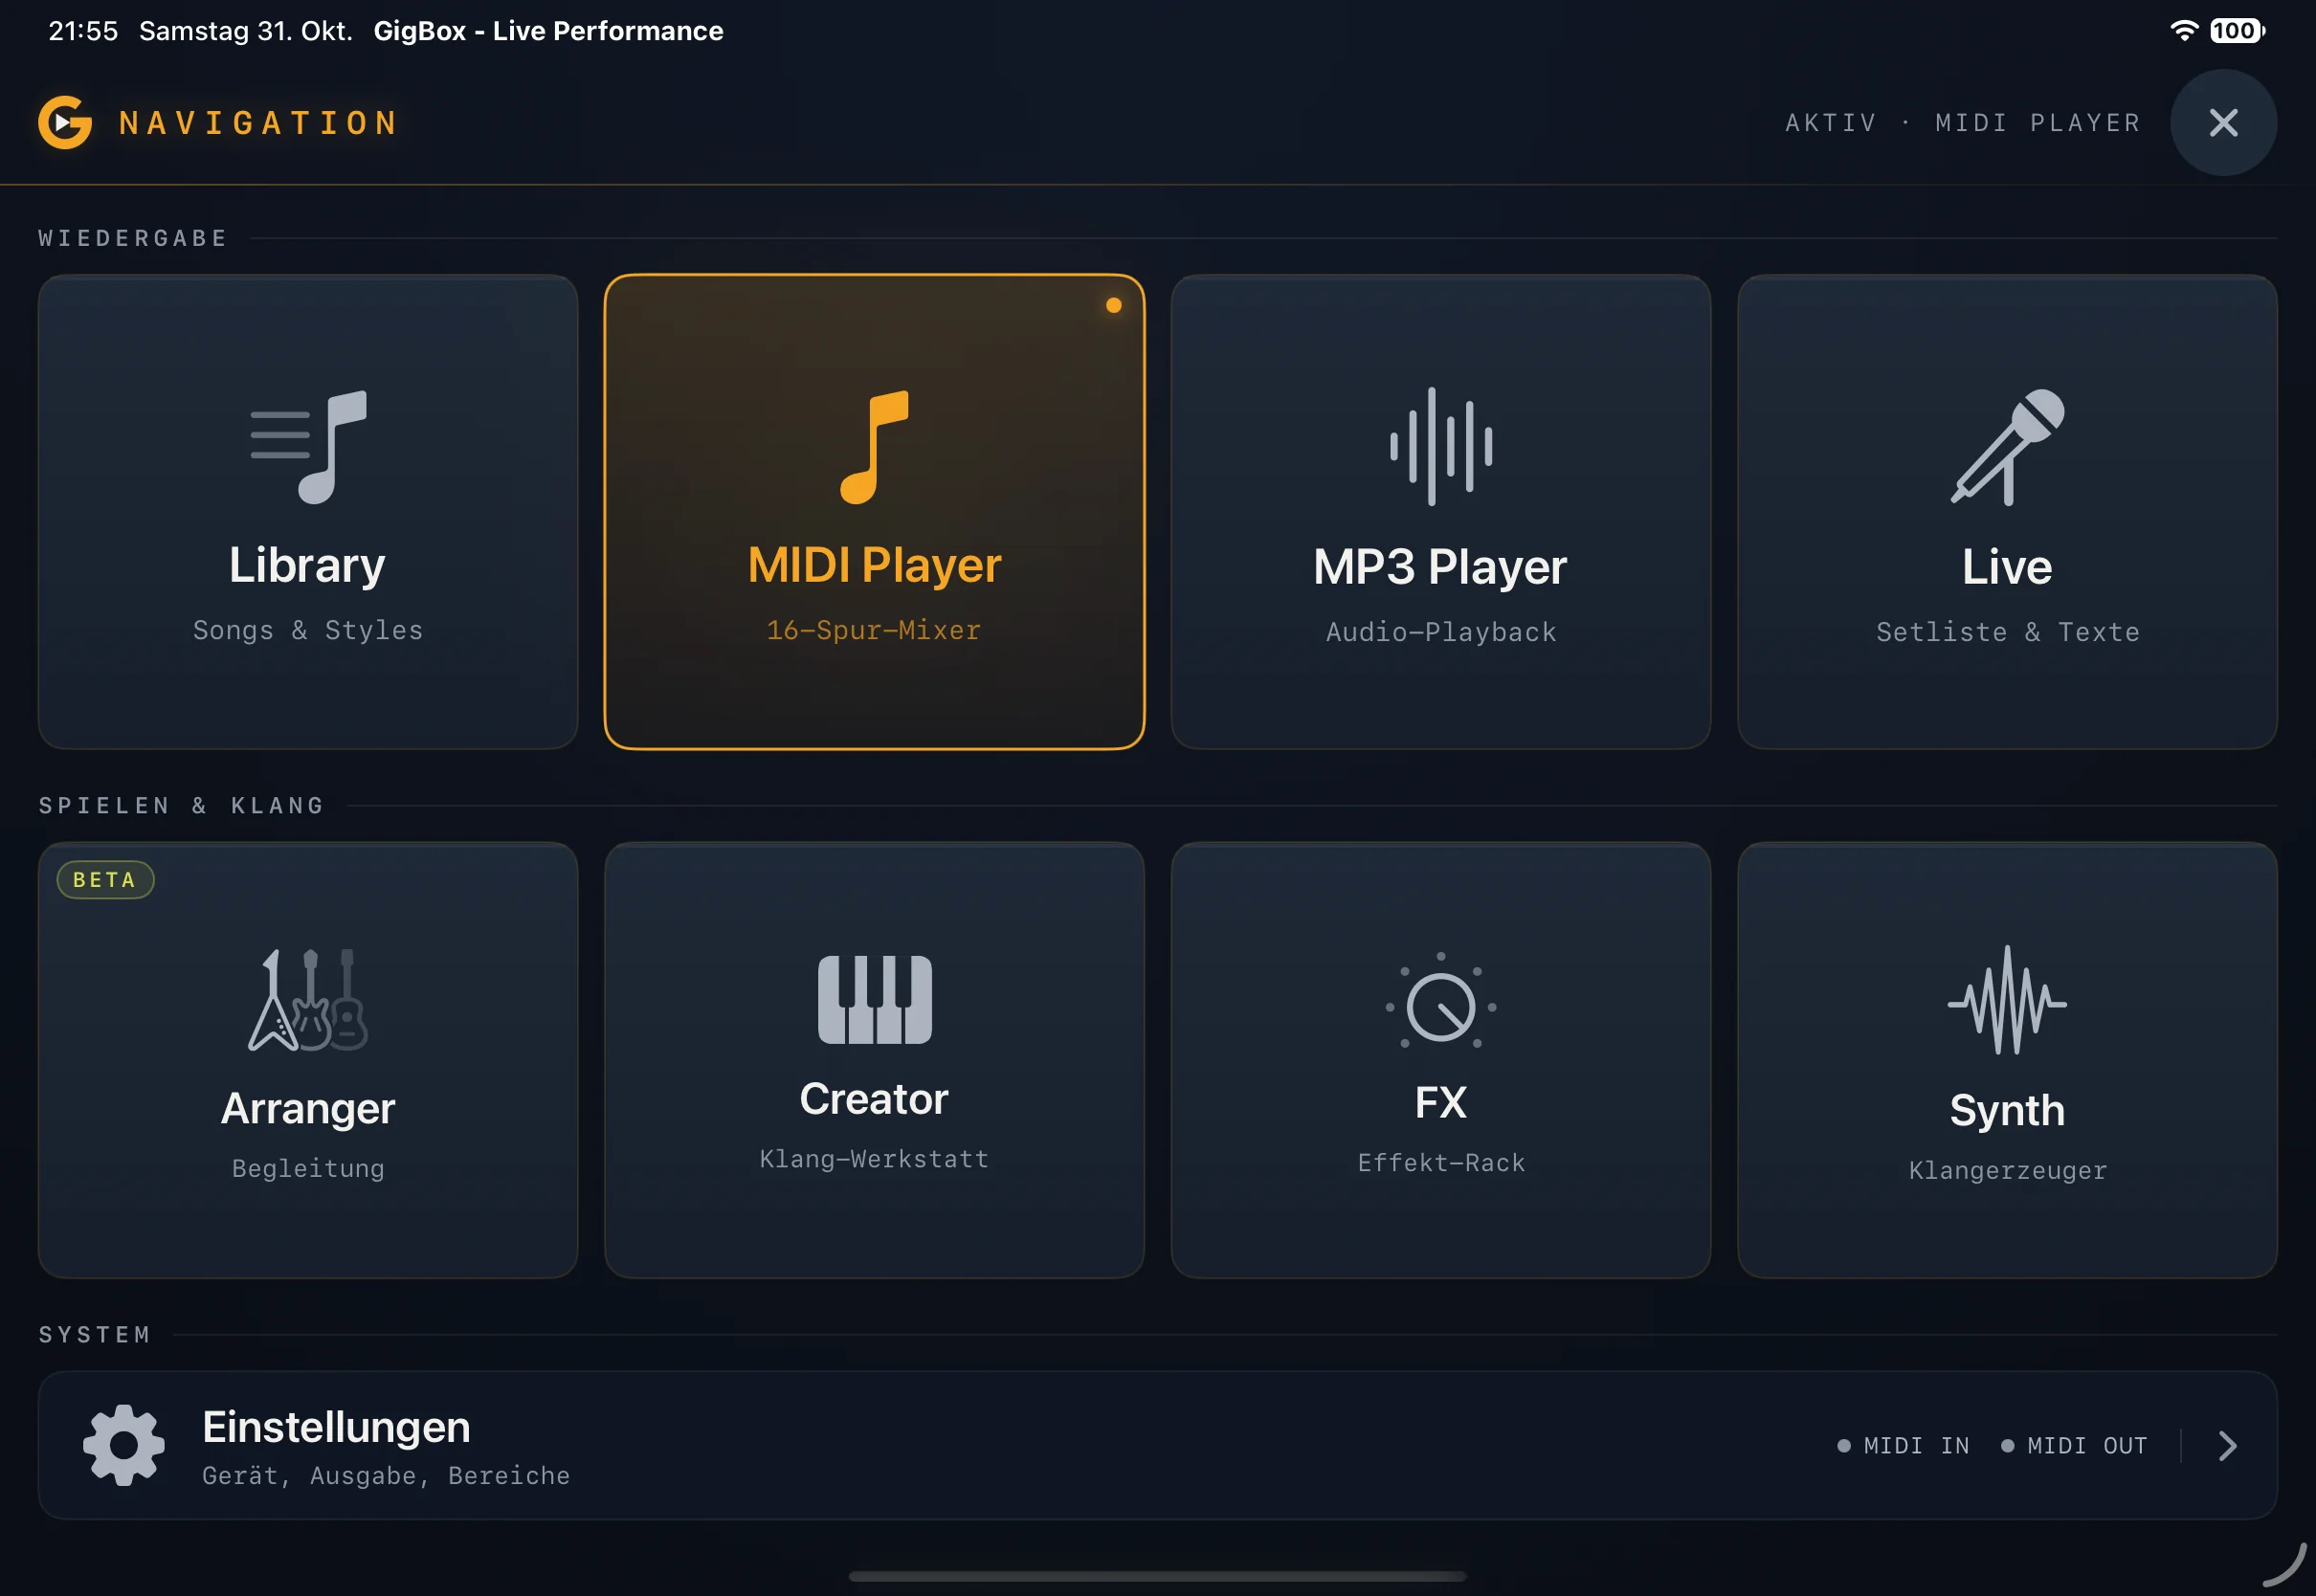
The MIDI Player plays standard and karaoke MIDI files through your Sound engine. You load files from the Library. At the top, you switch between three views:
- Mixer – the 16-channel mixer (default view),
- Lyrics – the file’s karaoke lyrics; the number shows the lines,
- Live Sounds – your performances saved in the Creator, as buttons.
Transport Dock
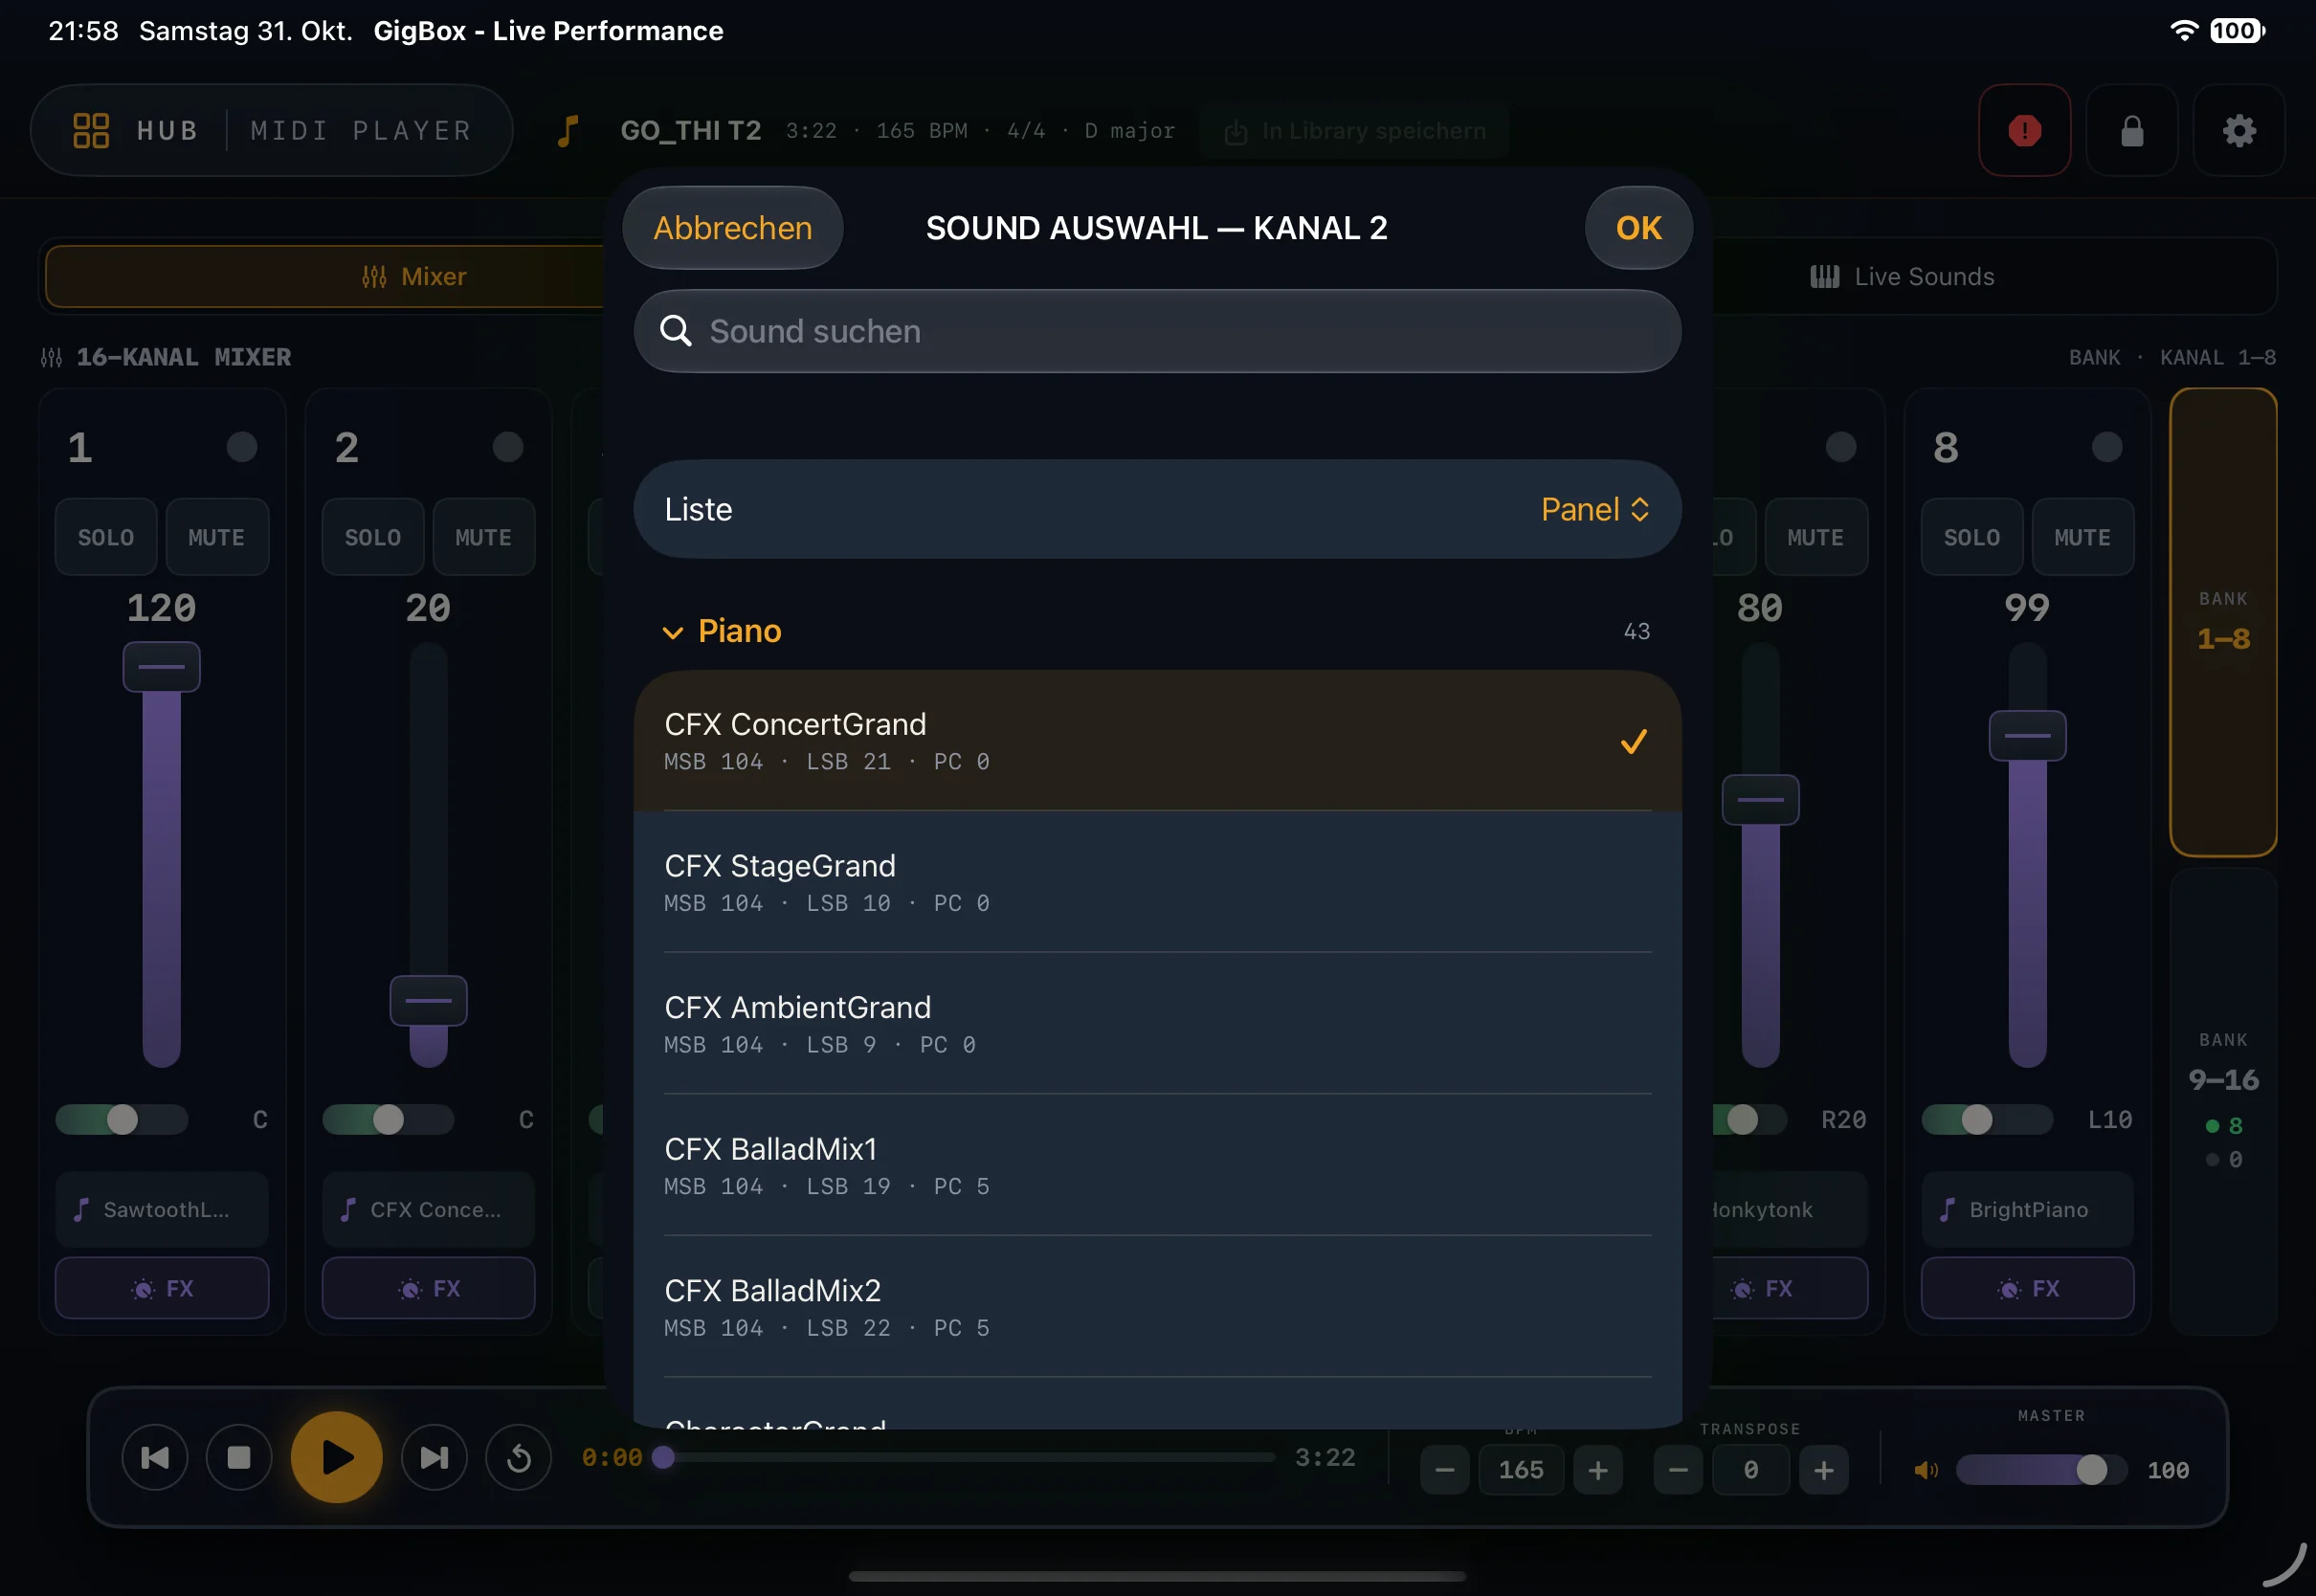
The transport dock floats at the bottom: Go to start, Stop, Play/Pause, Go to end, and Restart, next to the timeline for scrubbing. BPM changes the tempo, TRANSPOSE transposes in semitones – touch and hold + or − to count quickly. MASTER controls the volume of all 16 channels together; your live keyboard isn’t affected.
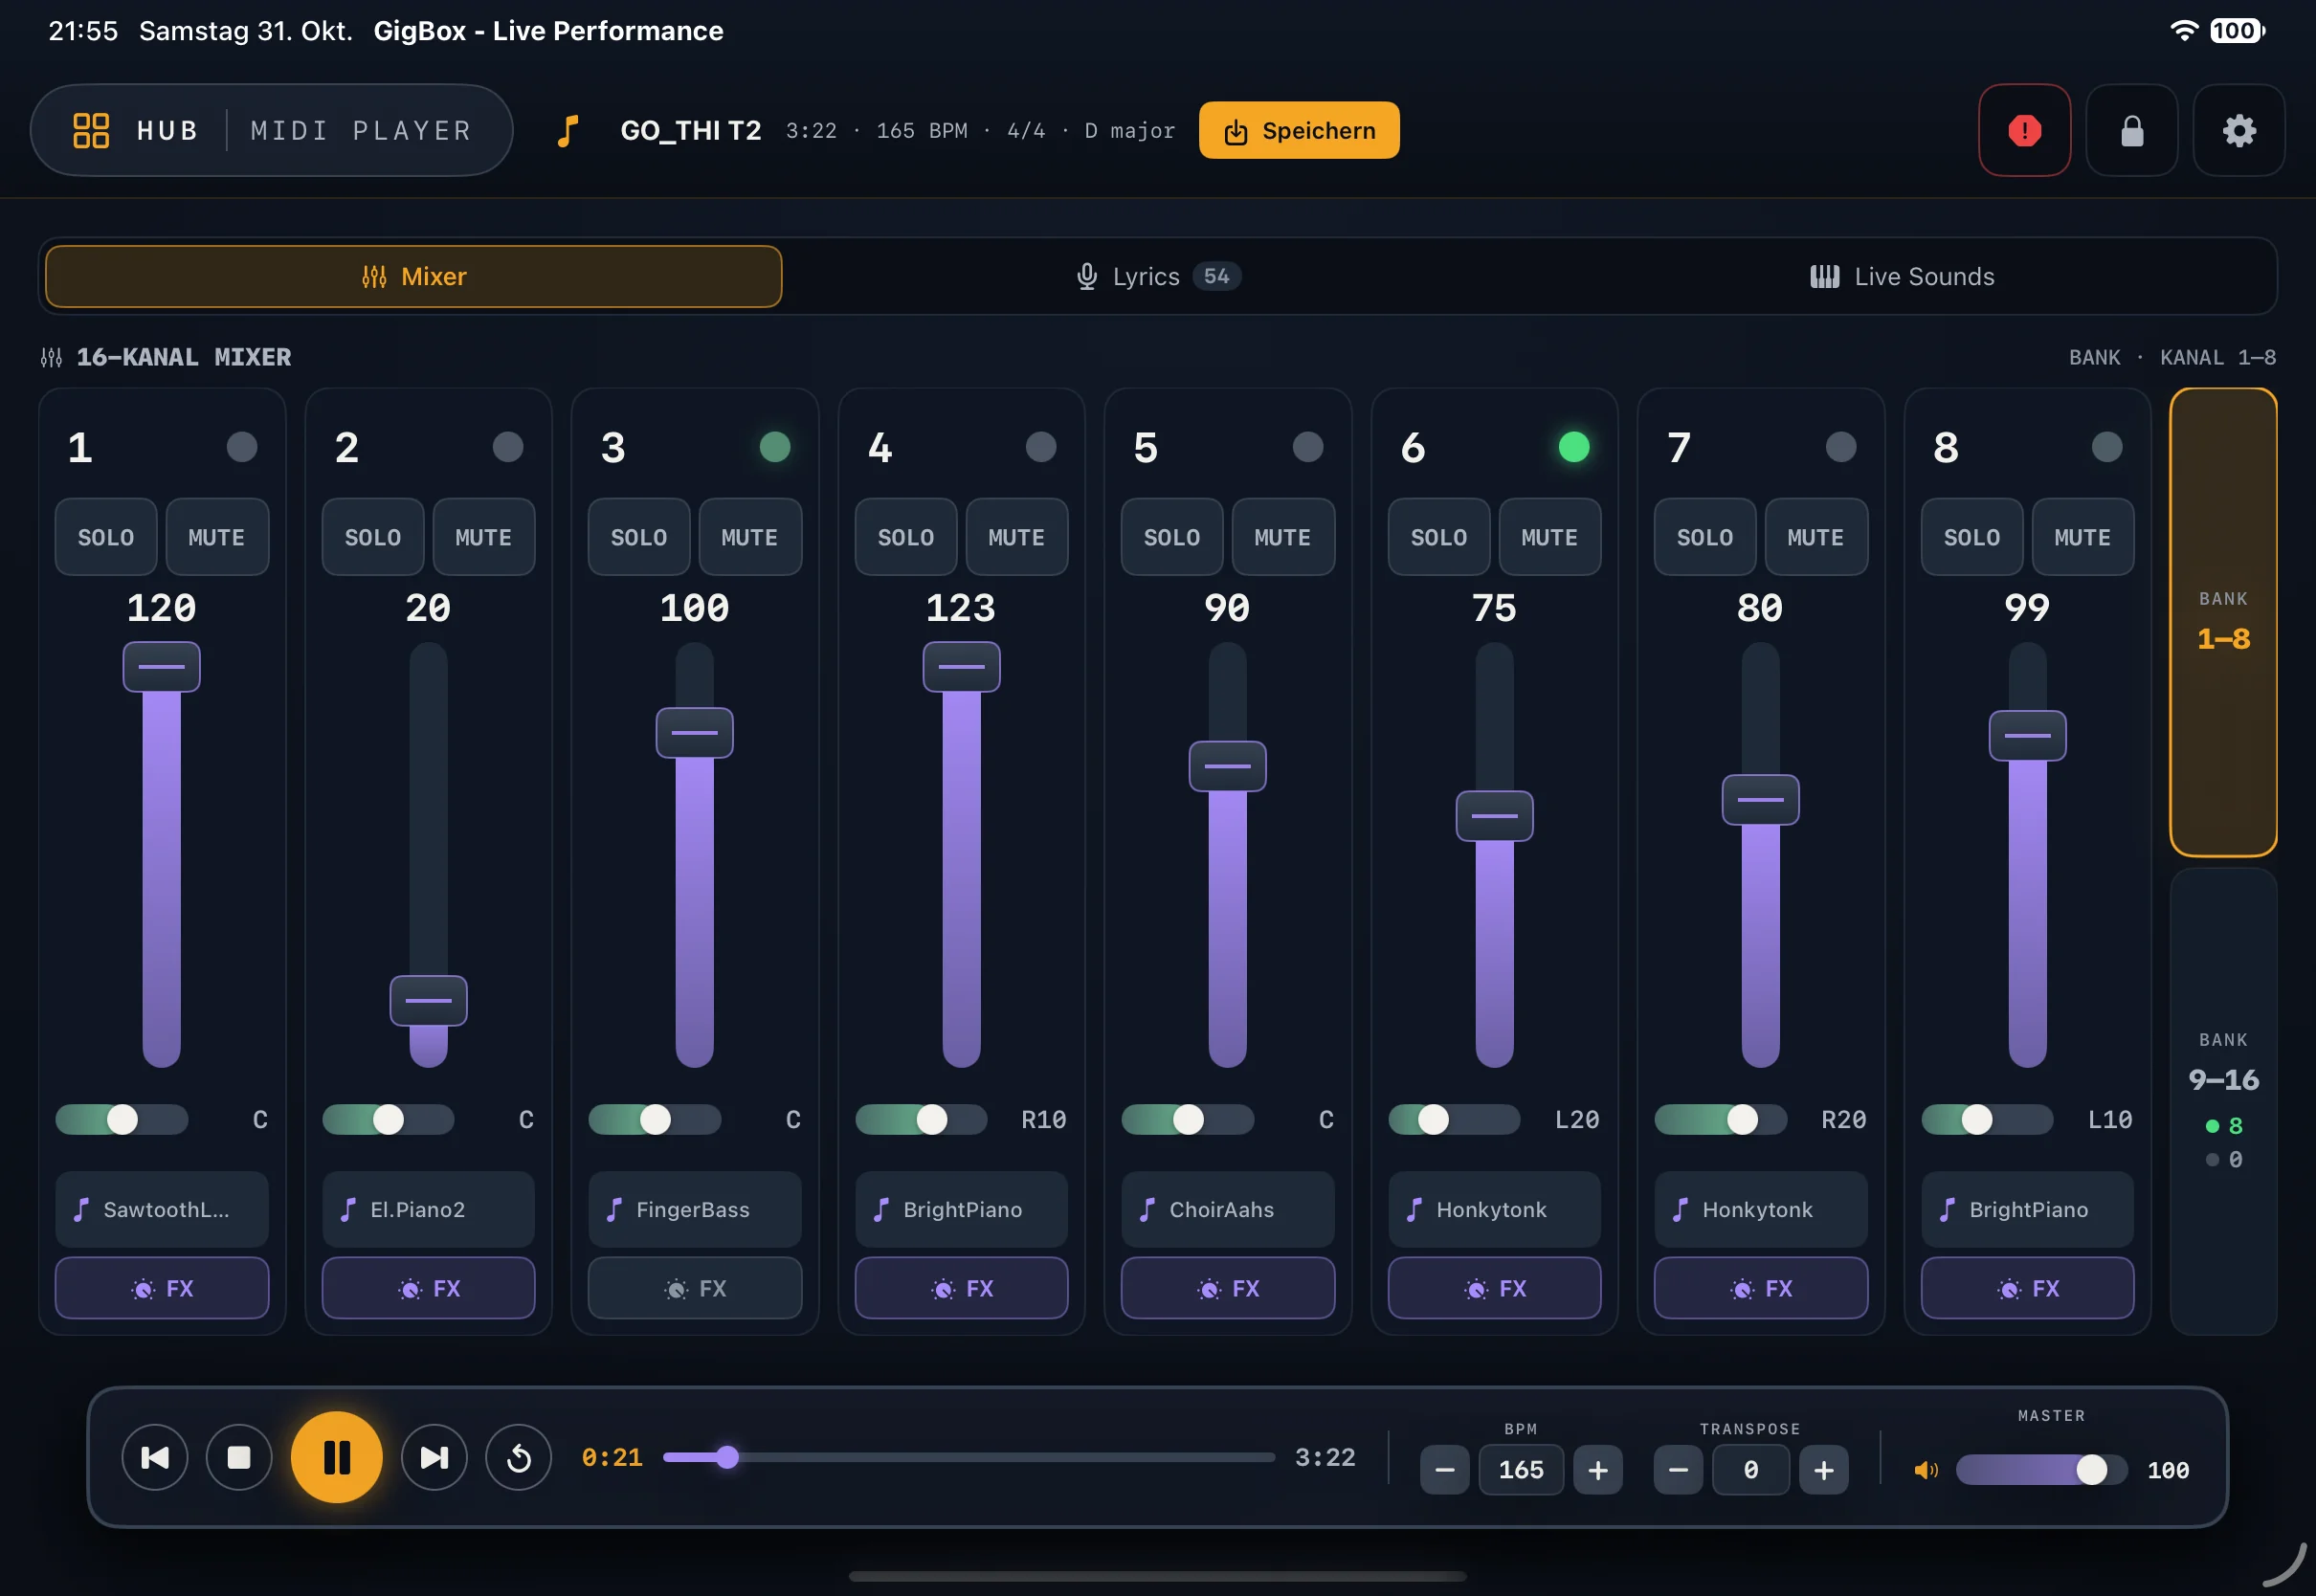
16-Channel Mixer
Each channel strip shows the channel number at the top and a light that turns green when notes play. Below that are SOLO, MUTE, the volume fader with its value, pan (C = center, L20, R10 …), the sound name, and the FX button. Use the two BANK buttons on the right to switch between channels 1–8 and 9–16. Empty channels show NOT ASSIGNED.
- Choose a sound: Tap the sound name. The SOUND SELECTION shows a search field (Search sound), the sound list, and expandable categories such as Piano; below each sound are its bank and program (MSB, LSB, PC). The current sound has a checkmark. Tap OK to apply it, or Cancel to leave everything as it was. On the drum channel, only drum kits are available.
- Send: Use FX below the channel strip to set the Reverb and Chorus amount for each channel. You control the effects themselves in the FX area.
Save Settings
When you’ve changed the mixer, tempo, or transposition, Save lights up at the top. A tap saves the settings with the song in the Library; afterward it reads Saved. If the file isn’t in the Library yet, the button says Save to library. The note icon to the left of the file name opens the MIDI file info with channels, sounds, and tempo changes.
 1
2
3
4
5
 1
2
3
4
MP3 Player
The MP3 Player plays backing tracks through the iPad’s audio output – independent of the MIDI device. If nothing is loaded yet, tap Load MP3 and choose a file from the iPad or iCloud Drive. Most of the time, though, you open MP3s directly from the Library or a setlist.
- LYRICS: If the MP3 has lyrics in its file tags, they scroll in sync. The number shows the lines.
- SPECTRUM: a live display of the frequency spectrum.
- CHORDS: If GigBox has detected the chords (in the Library: Extract chords), they play along. Under CHORD SYNC you shift them in time if they come too early or too late.
- TRANSPOSE: transposes the MP3 by up to ±3 semitones.
- VOLUME controls the MP3 volume, SYSTEM the iPad’s volume and audio output (e.g. Bluetooth or AirPlay).
Live
Live is the stage view: stage-size lyrics, transport, song list, and function keys on one screen. It plays MIDI files and MP3s.
Choose a Source
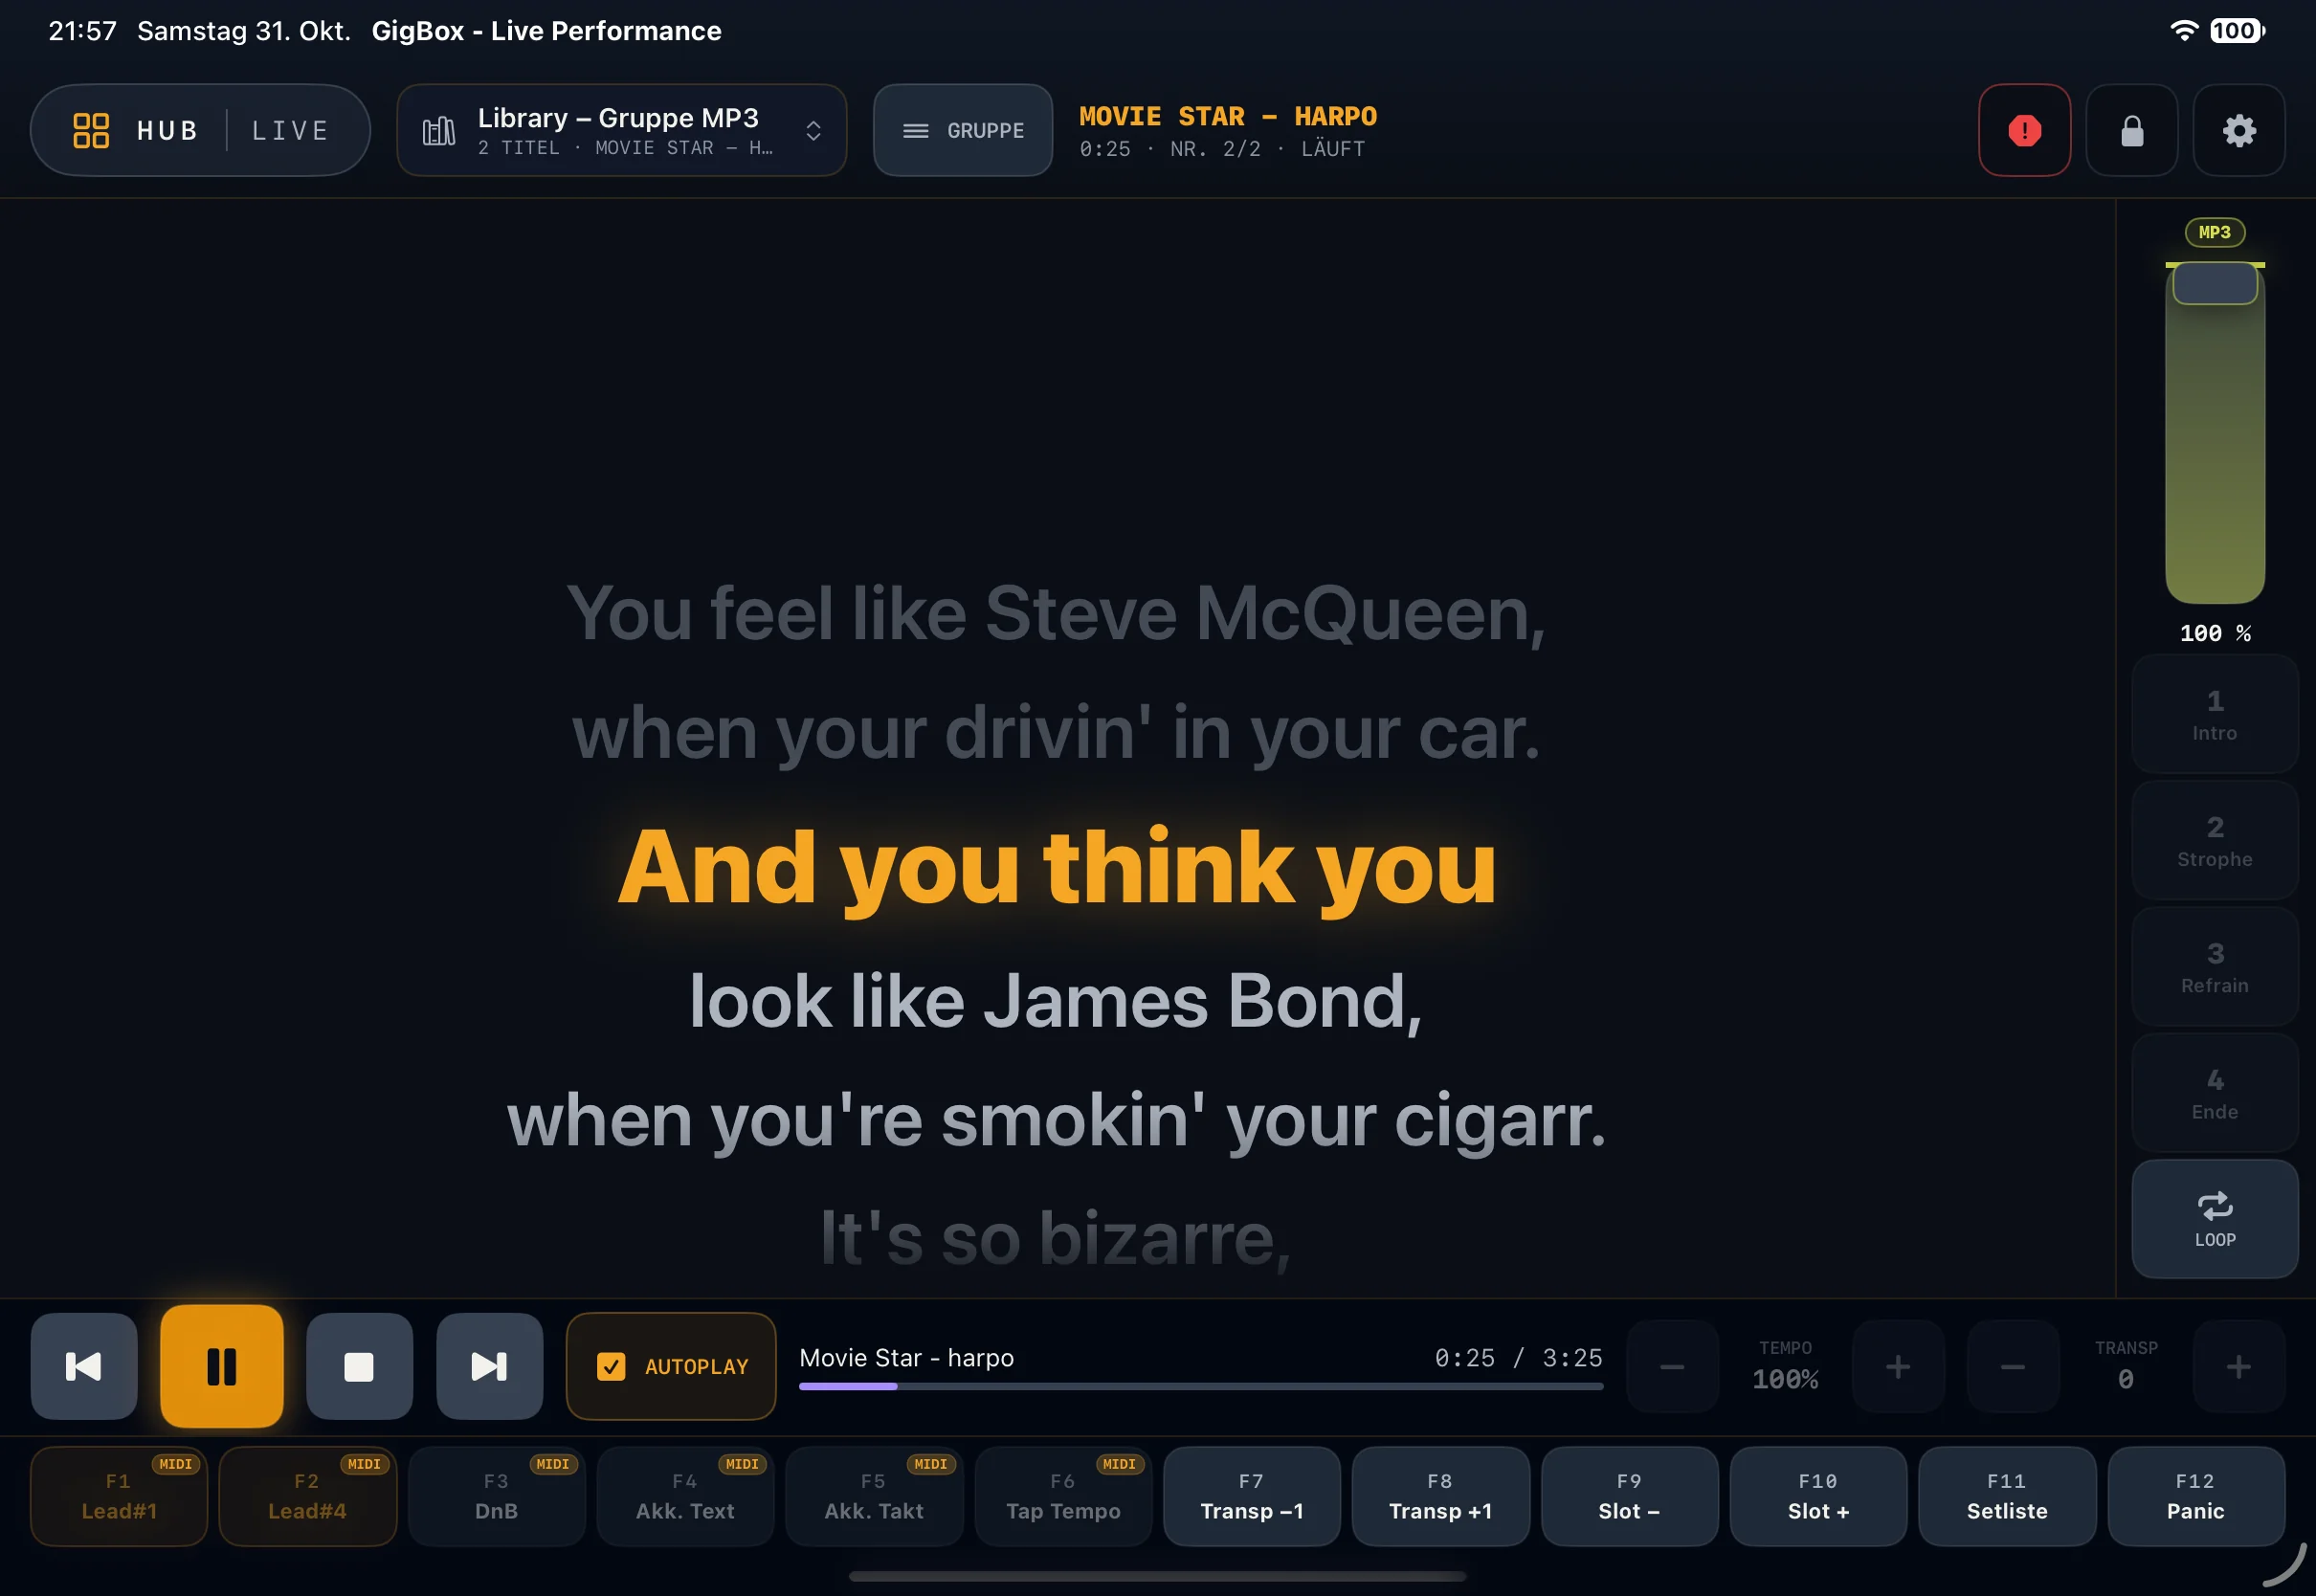
Tap Choose library at the top and choose a setlist or a group. The header bar then shows, e.g., Library – Group MP3 with the number of items. The button next to it (GROUP or SETLIST) shows the song list. To the right are the title, running time, position in the list (NO. 2/2), and the status: Ready, PLAYING, or STOPPED.
During the Song
- Tap ▶ in the transport bar to start – while nothing is playing, it says Press ▶ to start. The active lyric line is large and highlighted in color; the lines before and after are dimmed.
- TEMPO (in percent) and TRANSP (in semitones) change the tempo and key of the current song.
- AUTOPLAY starts the next item in the list automatically.
- The slider at the top right controls the song’s volume; the label above it shows whether a MIDI song or an MP3 is playing.
- If a MIDI song has section markers, the Intro, Verse, Chorus, and End buttons on the right jump there. LOOP repeats the current section.
Function Keys F1–F12
At the bottom are twelve freely assignable keys. A long press opens ASSIGN FUNCTION, a short press triggers the function. Options include:
- Tap Tempo, Panic, Setlist,
- Chords over lyrics and Chords with beats,
- Larger text / Smaller text, Transp +1 / Transp −1,
- Slot + / Slot −, Drum & Bass, Lead #1 off/on, and Lead #4 off/on.
Use CLEAR ASSIGNMENT to free up a key again. Functions that only work with MIDI songs carry the MIDI label and are dimmed for MP3s.
 1
2
3
4
5
6
Arranger
With the Arranger you play STY and PRS styles live: your left hand plays chords, and GigBox plays the accompaniment. This area is still labeled BETA.
- STYLE BROWSER: Tap the style name at the top and choose a style by category or under Favourites. Included styles carry BUILT-IN, imported ones MINE. Next to it you start (▶) and stop (■) the accompaniment; on the right are the active section, the tempo, and the status (PLAYING or STOPPED).
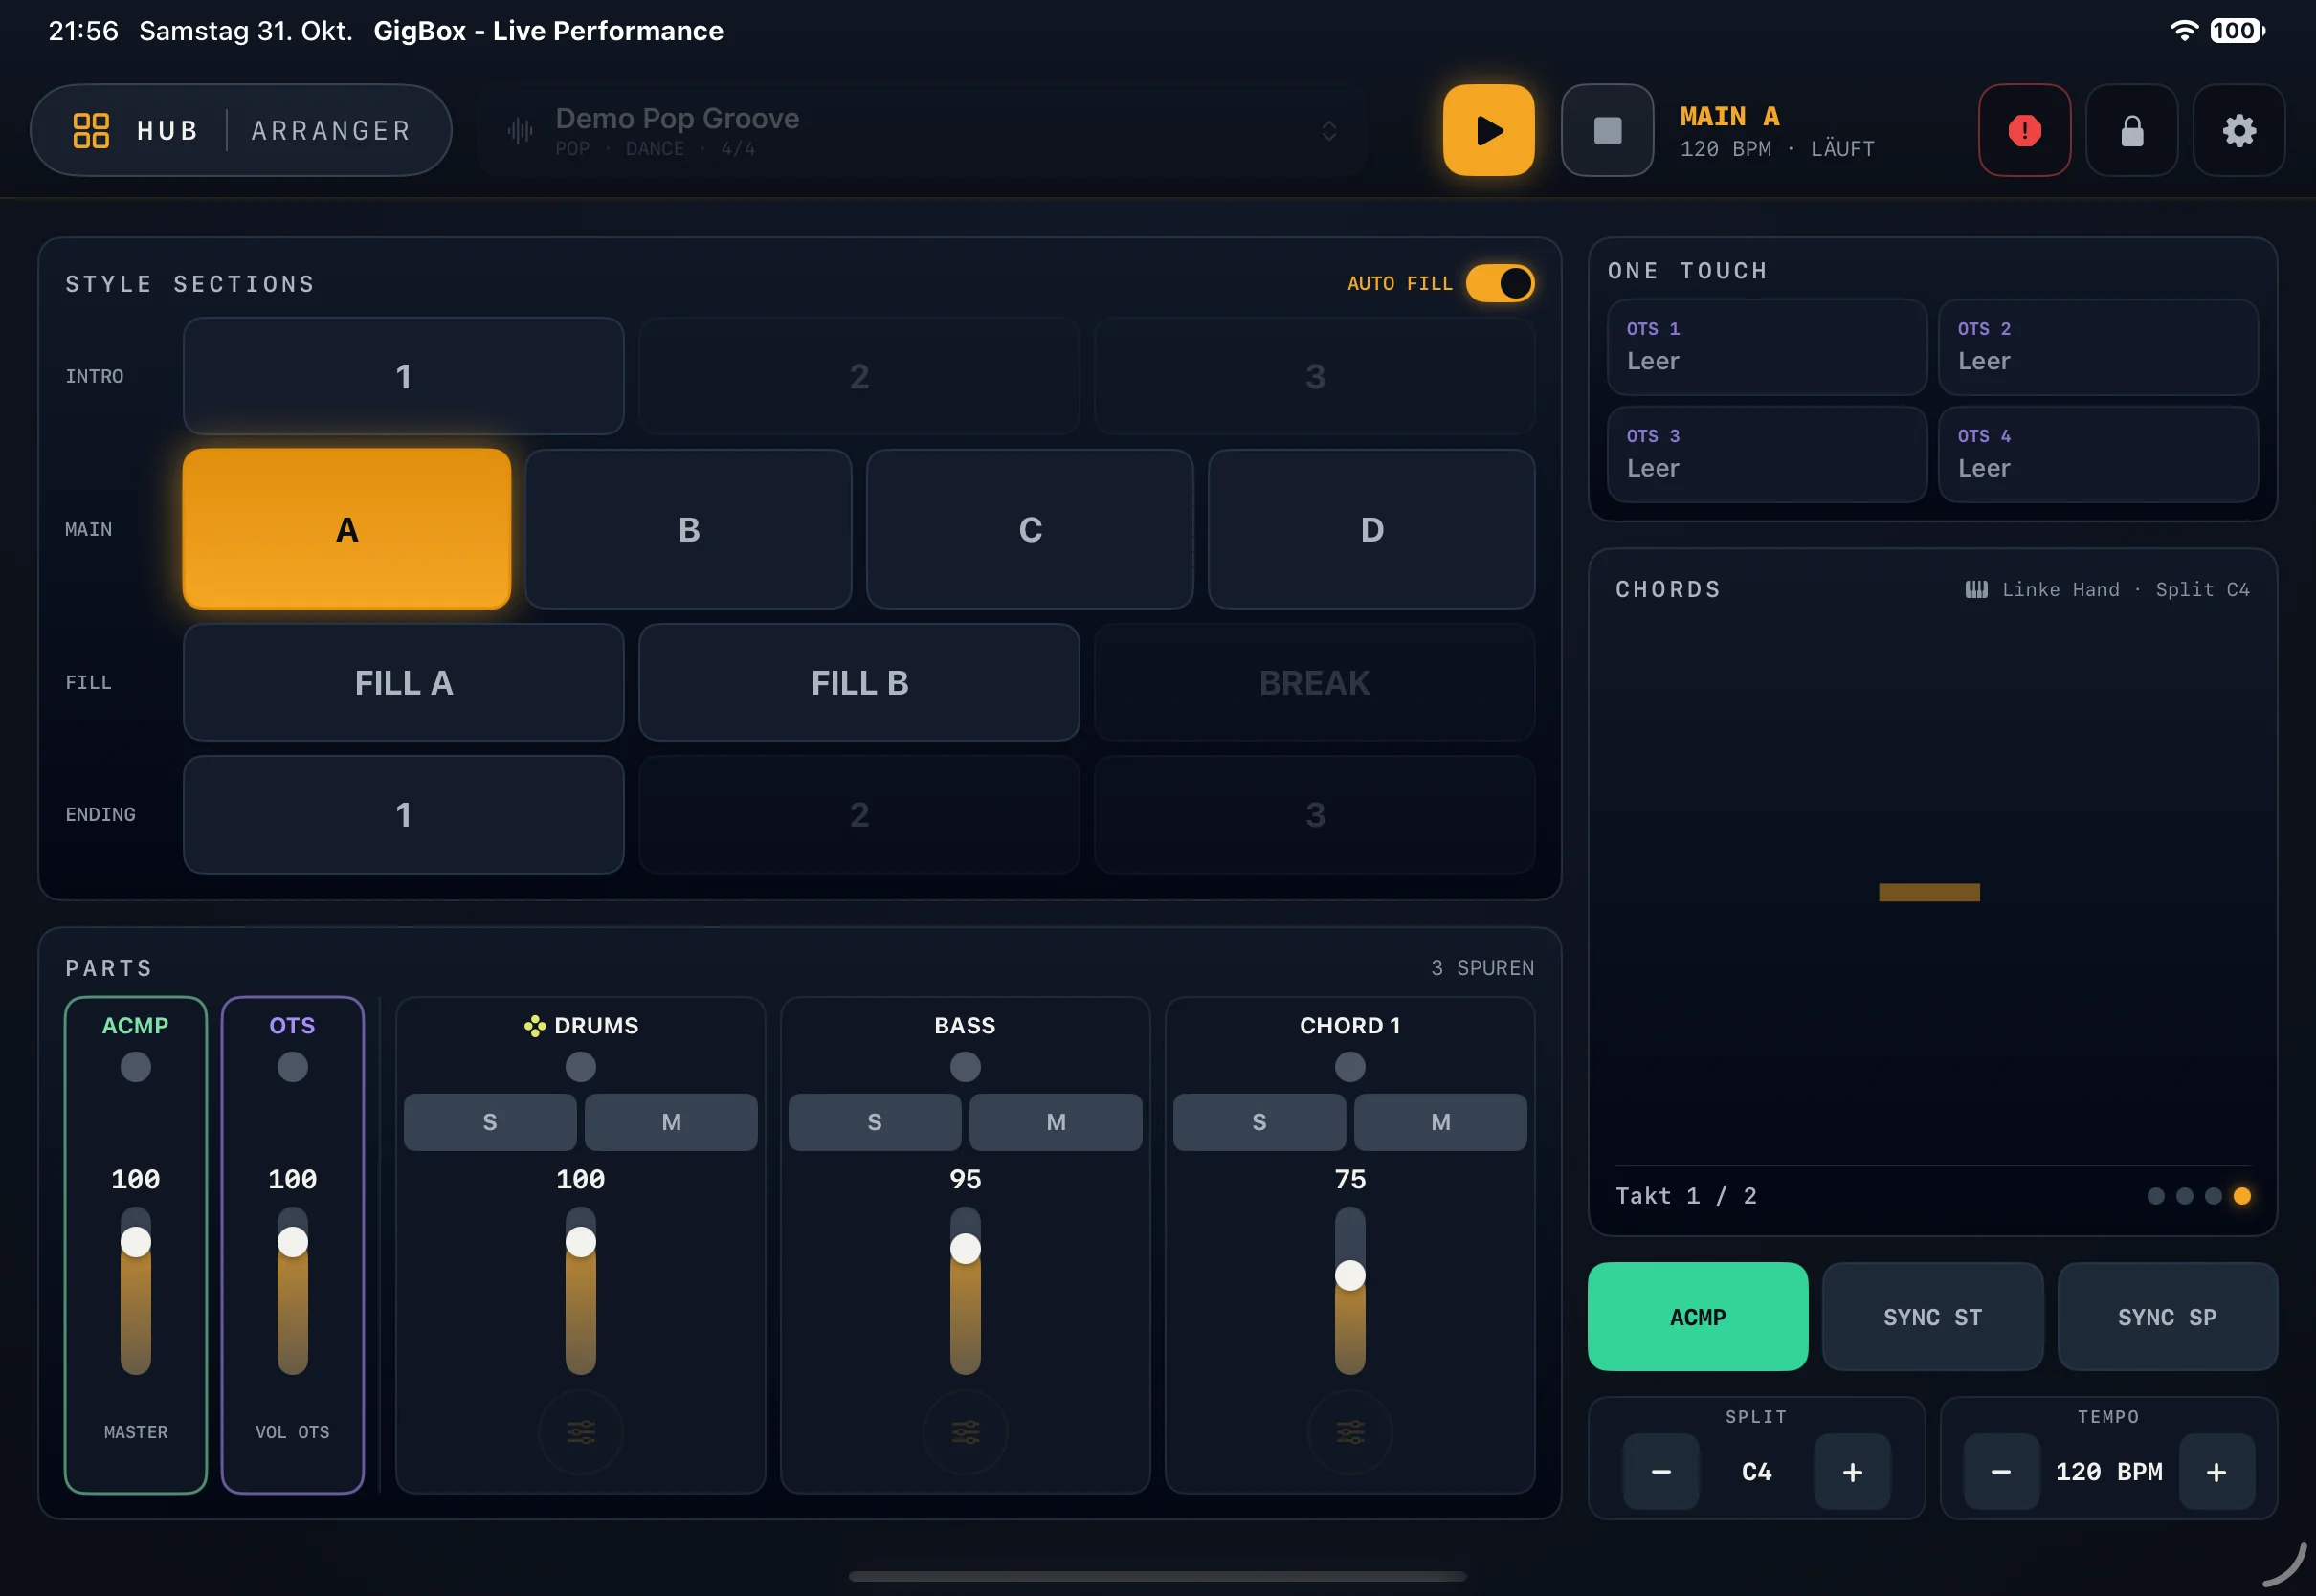
- STYLE SECTIONS: INTRO 1–3, MAIN A–D, FILL A, FILL B, BREAK, and ENDING 1–3. Sections the style doesn’t contain are dimmed. With AUTO FILL, GigBox automatically plays a fill when you change the main section.
- CHORDS: shows the detected chord. Left hand · Split names the split point – everything below it is used for chord detection. The Bar x / y display and the dots below it show the position in the section.
- ONE TOUCH: The One Touch Settings (OTS 1–4) recall matching sounds for the right hand. Empty slots show Empty.
- PARTS: volume for each accompaniment track (e.g. DRUMS, BASS, CHORD 1) with S (solo) and M (mute), plus ACMP as the accompaniment volume (master) and OTS as the right-hand volume. For each track you also set pan, reverb, and chorus amount; Reset to style default restores the style’s values.
- Control buttons: ACMP turns the accompaniment on or off. SYNC ST (synchro start) starts the style with the first chord, SYNC SP (synchro stop) stops it as soon as you release your left hand. Under SPLIT and TEMPO you change the split point and tempo with − and +.
MIDI Learn
You can assign Arranger buttons to pads or keys on your keyboard. Start MIDI LEARN and press a pad or key within the waiting time. GigBox shows Learned: … – tap Apply or Learn again. If the key is already assigned, the old assignment is moved. Delete all removes all assignments.
 1
2
3
4
5
6
Creator & Live Sounds
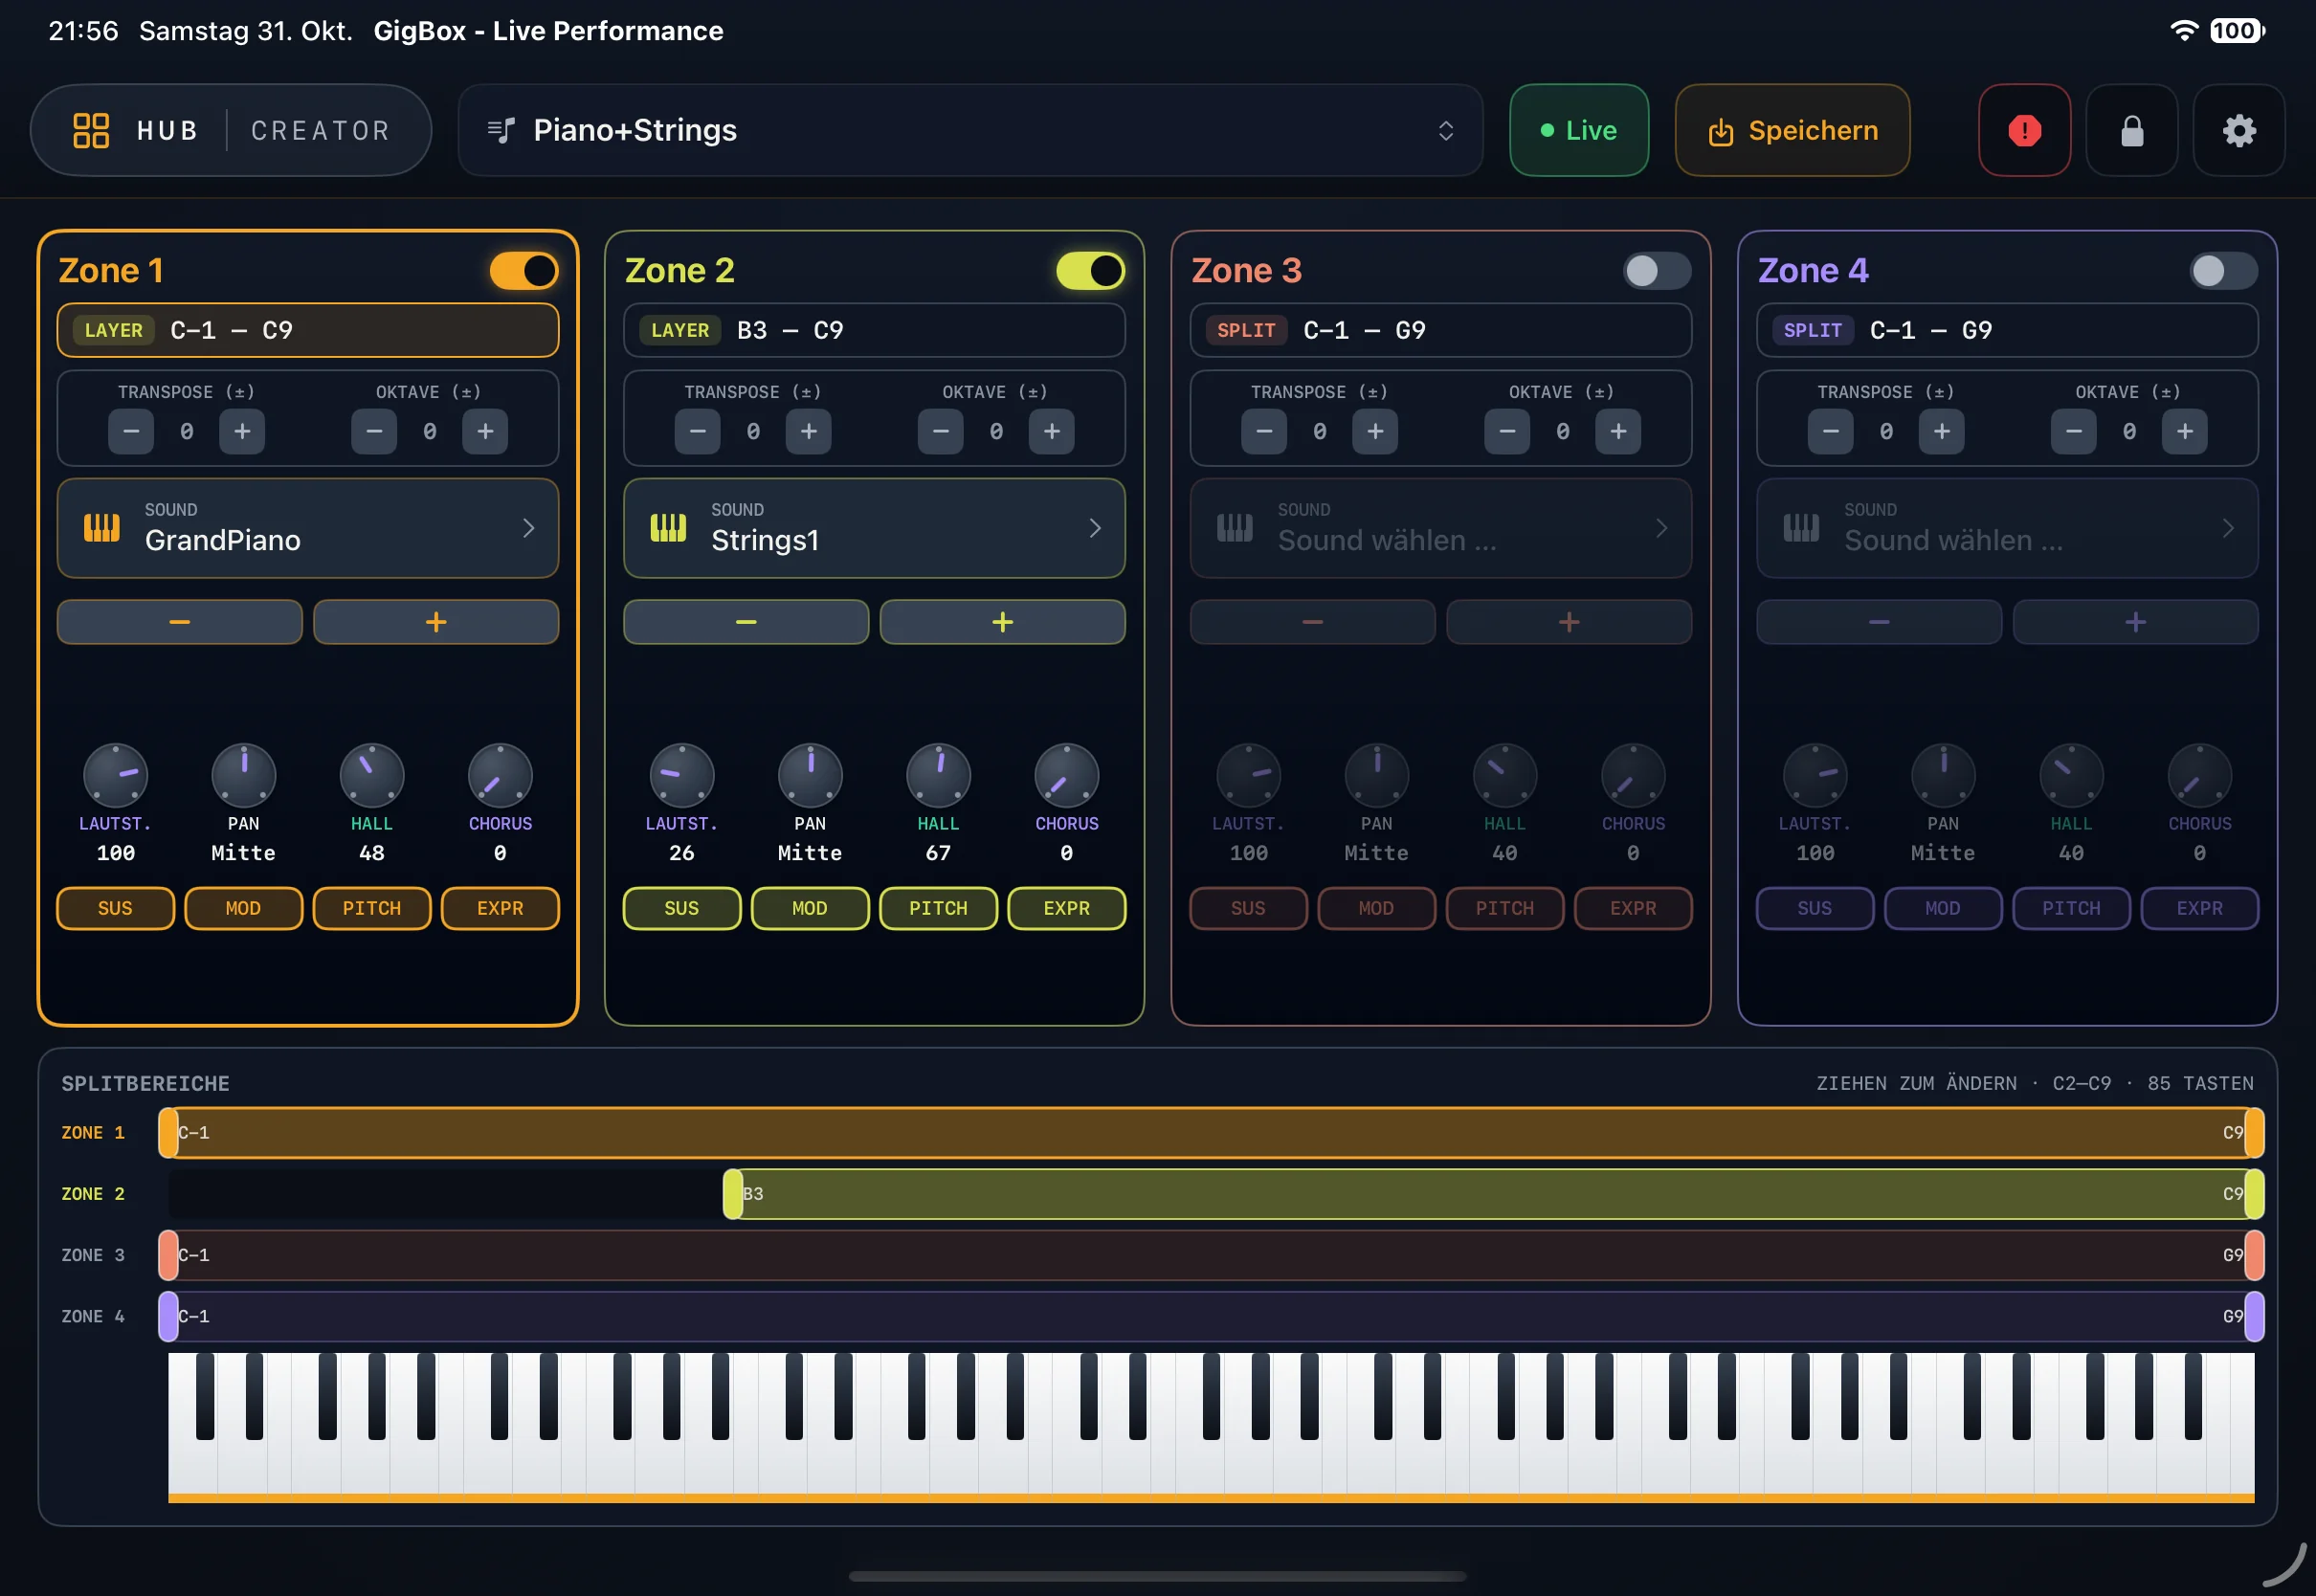
The Creator is your sound workshop for live playing. You divide the keyboard into up to four zones – as layers (stacked) or splits (side by side).
- Zone on/off: Use the switch at the top right of each zone card to turn the zone on. Zones that are off are dimmed.
- SPLIT ZONES: At the bottom, drag the boundaries of each zone above the keyboard (DRAG TO CHANGE). Each zone card shows its range, e.g. B3 – C9, and whether it plays as LAYER or SPLIT.
- SOUND: Choose sound … opens your instrument’s sound selection. Use − and + below it to step to the previous or next sound.
- Levels: VOL., PAN, REVERB, and CHORUS for each zone.
- Pitch: TRANSPOSE in semitones and OCTAVE.
- Controllers: For each zone, choose whether it responds to SUS (sustain pedal), MOD, PITCH, and EXPR.
Performances
A combination of all zones is called a performance. You choose it at the top in the header bar. The menu offers New performance, Rename, Save as copy…, and Delete; Save keeps your changes. The Live switch routes your keyboard through the current performance.
Saved performances appear as buttons in the MIDI Player under Live Sounds. That way you change your right-hand sound with a single tap while the song plays.
 1
2
3
4
5
6
7
FX
The effect rack controls your instrument’s global effects over MIDI. Which effects and types are available depends on the selected Instrument.
- Reverb: Type and Level (overall reverb).
- Chorus: Type and Mix (overall chorus).
- Master EQ: four bands on the master output – Low (shelf, approx. 40–1000 Hz), Mid 1 and Mid 2 (bell, approx. 60–8000 Hz), and High (shelf, approx. 1000–5000 Hz), ±12 dB each. Under PRESET you choose ready-made settings.
The effects apply to all channels. How much reverb and chorus a single channel gets is set as a send in the mixer of the MIDI Player. If your instrument doesn’t support global effects over MIDI, GigBox tells you – then you set reverb and chorus per channel only.
Synth (AUv3)
The Synth plays Audio Unit instruments (AUv3) installed on your iPad – with the same keyboard and in addition to your sound engine.
- Tap Choose plugin and choose a plugin under AUv3 Instruments. If one is missing, try Rescan.
- OPEN shows the plugin’s interface, if it has one.
- Choose the sound: depending on the plugin, under SOUND · PLUGIN PRESET, in your own slots (MY SOUNDS), or directly in the plugin. CHANGED shows that you’ve modified the sound.
- Under SYNTH RANGE, drag the key range. Outside of it, only your module plays – the synth doesn’t mute anything there.
- Set the volume under SYNTH LEVEL. The plugin itself handles pan, reverb, and delay.
Under PERFORMANCE you save up to 16 synth settings (SAVE) and recall them with a tap. The status at the top tells you what’s happening: Active · plays alongside, No plugin – silent, Synth off, or Paused in arranger.
Lyrics Display
The main iPad sends the running lyrics over Wi-Fi to iPhones and other iPads – encrypted and without the internet. That way singers and band see the lyrics on their own device. The lyrics display is free.
- Put all devices on the same Wi-Fi network.
- On the main iPad, go to Settings › Lyrics Mirror and turn on Stream lyrics.
- Open GigBox on the iPhone – it starts automatically as a lyrics display. On a second iPad, tap Use as lyrics display … in Settings.
- Tap Connect. The display shows Searching for GigBox on the iPad… and then Waiting for lyrics from the iPad… until a song plays.
The lyrics scroll along, the active line is highlighted, and below it you see the next line. Use the display’s buttons to make the text larger or smaller, show chords, and choose a color scheme: Default, White, Amber, or Green.
Settings
Open Settings with the gear at the top right or in the HUB under System.
Devices
- Keyboard / controller (MIDI input): the keyboard you play live. The light blinks with incoming notes.
- Sound engine (MIDI files): the output for MIDI files and the mixer.
- Sound engine live (Arranger, Creator, Synth): a second output or Same as sound engine.
- Instrument (Sound list): your device, sorted by manufacturer, or Standard. Profiles that haven’t been fully checked carry the suffix unverified.
- Audio output (MP3 Player): speaker, headphones, Bluetooth, AirPlay, or audio interface.
Other Sections
- Playback: Auto-play on load starts a MIDI file right after it loads. Remove lead-in automatically trims the silence at the start of many MIDI files.
- Arranger: Forward in milliseconds (default 20 ms).
- Chords: Chords above the lyrics and the Notation – International (B / Bb) or German (H / B).
- Lyrics Mirror: Stream lyrics and Use as lyrics display … (see Lyrics Display).
- Sound mapping: The Auto-Revoicer replaces misleading Yamaha sounds with matching sounds on import. Under Edit mappings you adjust individual mappings.
- Privacy: Anonymous usage statistics – without personal data and without an advertising identifier, and you can turn it off at any time.
- Unlock, Backup, and Reset: see the following chapters. At the very bottom are the build number, the liability notice, and the support address.
Backup & iCloud
Library, styles, lyrics, and performances are stored in iCloud Drive and synced across your devices. If you aren’t signed in to iCloud or iCloud Drive is off for GigBox, the app shows iCloud not active or iCloud access missing once at launch. Your data is then stored only on this iPad.
Create a Backup
- Open Settings › Backup and tap Create backup ….
- Choose what goes into the ZIP file – MIDI files, MP3s, styles, lyrics, performances, and settings.
- Choose the location, e.g. another iCloud folder or a USB stick.
MP3s can make the backup very large (limit: 4 GB). GigBox downloads files that exist only in iCloud first.
Restore
Tap Restore … and choose a backup. GigBox shows the date, app version, number of files, and size. Files with the same name are overwritten; others are kept. Then tap Quit app and open GigBox again.
Lock & Panic
Panic
The red Panic button at the top right is available in every area. A tap instantly turns off all notes – in the player, in live playing, and in the Synth. Use it when a note hangs.
Lock
Use the padlock to lock GigBox when you leave the stage for a moment. Choose a 4-digit PIN and confirm it. Playback continues, but no one can tap anything. To unlock, tap the screen and enter the PIN.
Unlock
GigBox is free to download. A one-time in-app purchase – no subscription – unlocks all areas. Until then, a locked area shows the message … is locked with the Unlock button.
- The purchase applies to all devices with the same Apple Account. Family Sharing is enabled.
- If you’ve already purchased, tap Restore purchases – in the locked area or under Settings › Unlock.
- The lyrics display on iPhone and a second iPad always stays free.
Gestures & Shortcuts
These moves save you time on stage:
| Tap the HUB pill | Open the HUB |
| Double-tap the HUB pill | Jump to the last area you used |
| Swipe down | Close the HUB |
| Panic button | All notes off |
| Long-press an F key | Assign a function (Live) |
| Short-press an F key | Trigger the function (Live) |
| Touch and hold + / − | Change BPM and Transpose quickly |
| Touch and hold an entry | Context menu in Library and setlists |
| / or ⌘ K | Search this user guide |
Tips & FAQ
Which devices does GigBox run on?
The full app runs on the iPad. On the iPhone and a second iPad, GigBox shows the lyrics display.
Do I need an external MIDI device?
No. GigBox plays through any connected MIDI device or through the iPad’s audio output. MP3s play independently of the MIDI device anyway.
I don’t hear anything when I start a MIDI song.
Under Settings › Devices, check that a Sound engine is selected and that its light blinks during playback. Also check MASTER in the transport dock and MUTE and SOLO in the mixer.
The sound names in the mixer don’t match my keyboard.
Choose your model under Settings › Devices › Instrument. With Standard, GigBox shows the General MIDI sounds.
I forgot the lock PIN.
The PIN isn’t stored anywhere. Quit GigBox completely in the App Switcher and restart the app – the lock is removed.
The lyrics display can’t find my iPad.
Both devices must be on the same Wi-Fi network, and Stream lyrics must be turned on on the main iPad. Also allow GigBox to access the local network if iPadOS asks.
Does the band have to pay for the lyrics display?
No. The lyrics display on iPhone and a second iPad is free, even without a purchase.
How do I contact support?
Write to cg@it-secrets.de. You’ll also find the address at the very bottom of Settings.